Imagine entering your garden and being greeted by the gentle sounds of nature, the fragrance of blooming flowers, and the sight of shimmering water. Building a natural pond in your garden can transform this dream into reality. A natural pond serves as a serene sanctuary, attracting wildlife and enhancing outdoor space. Unlike traditional ponds, a natural pond uses plants to maintain ecological balance without requiring pumps or filters. A pond liner is used to hold water, in this guide, we’ll show you how to create a beautiful, low-maintenance natural pond.
What is a Natural Pond
A natural pond is a water feature designed to mimic the ecological balance of natural bodies of water. Unlike traditional ponds that rely on pumps and filters to maintain water quality, a natural pond uses plants, rocks, and microorganisms to create a self-sustaining ecosystem. The pond liner holds the water, while a variety of native aquatic plants help filter and oxygenate it, keeping it clear and healthy. This type of pond attracts diverse wildlife, from birds and frogs to beneficial insects, creating a serene and dynamic focal point in your garden. By integrating seamlessly with the surrounding landscape, a natural pond enhances the beauty of your outdoor space while promoting biodiversity and providing a tranquil retreat.
Planning Your Natural Pond
Define Your Objectives
Determine the purpose of your pond. Is it for wildlife, relaxation, or garden aesthetics? Knowing your goals will guide your design and plant choices. A natural pond designed to attract wildlife may include shallow areas for birds and amphibians, while a general pond for relaxation might feature seating areas and soothing water plants.
In our case, it was to create the centre of a wild area of the garden and attract more wildlife and insects.
Select the Perfect Location
Choose a spot with a balance of sun and shade, good drainage, and away from utilities. Avoid areas where overflow could cause damage. A sunny location helps aquatic plants thrive, but too much sun can lead to excessive algae growth. Aim for a spot that gets about six hours of sunlight a day.
Size and Shape
Decide on the dimensions and shape of your pond. Irregular shapes often look more natural and blend seamlessly with the garden environment. Consider the scale of your garden to ensure the pond is proportionate. Larger ponds are easier to maintain because they create more stable ecosystems but you will need to pick a size suited to the space available.
Budget and Safety
Set a budget considering the cost of the liner, plants, and rocks. Ensure safety measures are in place if you have children or pets. Installing a fence or using a pond cover can help prevent accidents. Budgeting for high-quality materials will pay off in the long run with reduced maintenance costs.
Wildlife Considerations
Design your pond to attract wildlife with features like shallow areas for easy access and a variety of plants to provide habitat. Include logs or rocks for perching and basking, and avoid using chemicals that can harm wildlife. Consider adding a small solar fountain to keep the water moving and prevent stagnation, which attracts mosquitoes.
Materials and Tools
Materials
- Pond Liner: Choose a durable liner like EPDM rubber or low-density polyethylene. EPDM rubber is highly flexible and resistant to UV rays, making it a long-lasting option. We went for the Hozelock Pond Liner made of polyethylene as it was easily available locally.
- Rocks and Gravel: For creating a natural edge and substrate. Use a mix of sizes to create visual interest and mimic natural water bodies.
- Aquatic Plants: Native species as these plants are well adapted to local conditions and support local wildlife.
- Hose and Fittings: For filling the pond and ensuring proper water flow.
Tools
- Shovel/Spade and Pickaxe: A pickaxe is useful for breaking up hard soil or rocks. If you can get a good quality stainless steel pickaxe, it will last a lifetime and always look like new.
- Wheelbarrow: For transporting materials. A sturdy wheelbarrow will save time and effort.
- Spirit Level: To ensure even edges. Keeping the pond level ensures proper water distribution and prevents leaks allowing the pond to be filled to the desired level. For this I used my Dewalt Laser Line, it works great has has lasted for years but any level will work.
- Utility Knife: For trimming the liner. A sharp knife ensures clean cuts, preventing tears. I use the Bosch Utility Knife, it is premium quality and folds up neat and safe when not it use.
- Rake: For smoothing the pond base. A smooth base protects the liner from punctures.
- Measuring Tape and Marker: For layout accuracy. Accurate measurements ensure the pond fits your design.
Excavating the Pond
- Mark the Pond Area: Outline your pond with paint or stakes, a garden house can also be used to give a nice curved shape. This helps visualize the shape and size.
- Start Digging: Dig from the perimeter towards the centre, keeping soil for later use. Create shelves at different depths for plants and wildlife.
- Check Depth and Slope: Ensure the pond reaches the desired depths and smooth the base with a rake. The pond should have varied depths to support different plant species and wildlife.
Installing the Pond Liner
- Prepare the Base: Remove sharp objects and debris. A layer of sand or old carpet can protect the liner. In our case, we had some old laminate flooring underlay which worked well. Even a small stone can puncture the liner when the pond is filled. It is important to take the time to ensure the liner if well-protected before filling.
- Unroll the Liner: Spread it over the excavation, allowing excess to drape over the edges. Allow the liner to relax in the sun for easier handling.
- Settle the Liner: Press into the contours, removing wrinkles. Work from the centre outwards to avoid air pockets.
- Secure the Edges: Use rocks or bricks around the perimeter. This keeps the liner in place and blends the pond into the landscape. We used sods of removed grass to places around the edge of the pond.
- Trim Excess Liner: Leave some overhang to tuck under edging materials. This prevents the liner from slipping and hides it from view.
Adding Natural Features
- Incorporate Rocks and Gravel: Use varied sizes for a natural look, spreading gravel on the pond base. Large rocks can create hiding spots for wildlife.
- Create Plant Shelves: Form shelves at varying depths for different aquatic plants. Shelves provide stability for plants and add visual interest.
- Design Deeper Areas: Include a deeper section for fish and hibernating wildlife. Deeper areas help regulate water temperature.
Step by step
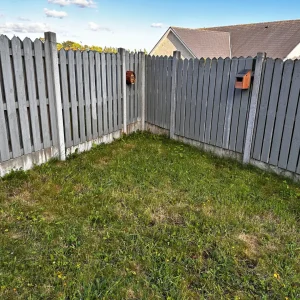
The far corner of the garden made sense for us.
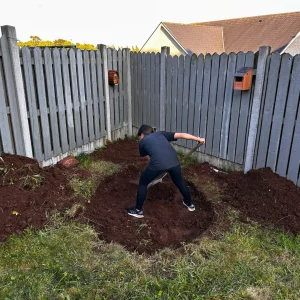
After marking out the size we set about digging the pond.
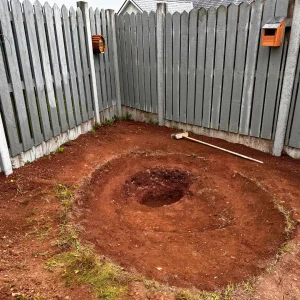
Our pond has 4 levels, one deep area for certain plants and reduced depths for others.
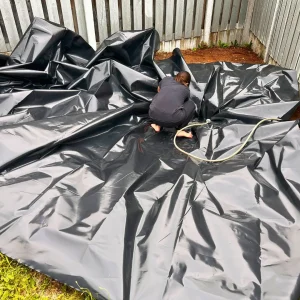
Farah climbed in during filling to ensure the liner was positioned and folded neatly.
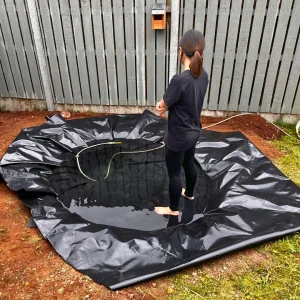
Continue filling the pond until it has reached the maximum level and overflowed. This ensures the edge is level before covering.
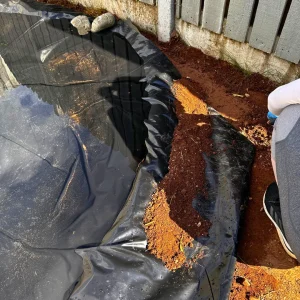
Now remove the excess liner using a sharp utility knife. You can then cover it with soil, paving stones or grass sods as desired.
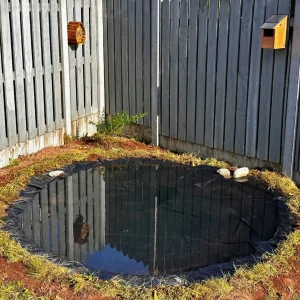
All edging is trimmed and covered. We ran out of paving stones and plan to add these at a later stage.
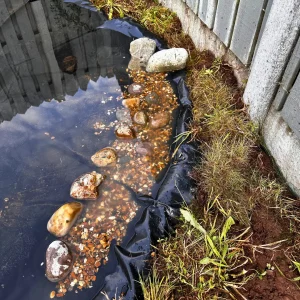
We now added gently stones and gravel to give a substrate for plants to root into. Before putting in the pond all gravel was rinsed to reduce how much dirt was added to the pond.
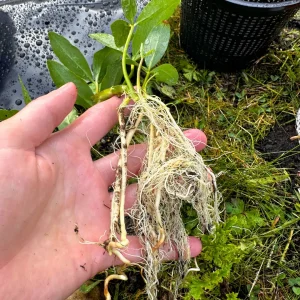
To reduce the amount of soil in the pond we rinsed off the pond plants removing all soil and set them in amongst the gravel.

Some of the bigger plants we left in their growing pots with a rock in the bottom to weigh them down.

All plants and gravel were added, and the Pond Lilly we placed in the deep section along with underwater oxygenating plants.
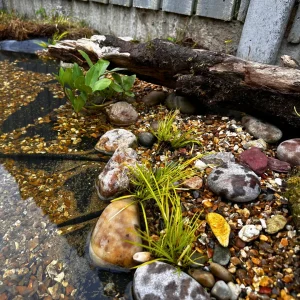
This shallow area is for easy access by wildlife and is ideal for shallow water plants. The log we found on the beach nearby.
Filling and Landscaping
- Fill the Pond: Slowly fill with water, allowing the liner to settle. For this part Farah went into the pond, carefully folding and stretching the liner to ensure it was fitting correctly.
- Select Aquatic Plants: Choose a mix of native species for a balanced ecosystem. Group plants with similar needs together and ensure they are placed at the correct depths.
- Landscape Around the Pond: Use ornamental plants, stones, and mulch to integrate the pond with your garden. Create pathways and seating areas for enjoyment.
Maintenance and Care
- Maintain Water Quality: Use plants to naturally filter the water and control algae. Avoid using chemicals that can harm the ecosystem.
- Seasonal Tasks: Clean in spring, monitor in summer, and prepare for winter. Each season requires different maintenance to keep the pond healthy.
- Fish and Wildlife Care: Feed fish appropriately and provide habitat for local wildlife. Ensure there are hiding spots and food sources for various species.
Conclusion
Creating a natural pond enhances your garden’s beauty and promotes biodiversity. With careful planning and the right materials, you can enjoy a tranquil oasis that requires minimal maintenance. Start your pond-building journey today and transform your garden into a serene retreat.
Embrace the tranquillity and joy a natural pond brings, knowing you’ve created a haven for yourself and local wildlife. Your garden will not only become a place of beauty and relaxation but also a vital part of the ecosystem, contributing to the health and diversity of your local environment.
We will update this post regularly with the progress of our pond.
For more tips on enhancing your garden’s ecosystem, check out our article on 6 Ways to Promote Biodiversity in Your Garden.

Natural Pond FAQs
What is a natural pond?
A natural pond is a water feature designed to mimic the balance of natural ecosystems, using plants and beneficial bacteria to maintain water quality without the need for pumps or filters.
How do I choose the right location for my natural pond?
Select a spot that gets about six hours of sunlight daily if possible, has good drainage, and is away from utilities. Avoid areas where overflow could cause damage.
What materials do I need to build a natural pond?
Essential materials include a pond liner, rocks and gravel for edging and substrate, native aquatic plants, and fittings for filling the pond.
How deep should a natural pond be?
A natural pond should have varying depths to support different plants and wildlife. Typically, a depth of 2-3 feet in the deepest area is sufficient for most purposes.
What types of plants are best for a natural pond?
Native aquatic plants are ideal as they help maintain the ecosystem and support local wildlife.
How can I control algae in my natural pond?
Algae control can be achieved by shading the water with plants like water lilies, maintaining a balanced ecosystem, and avoiding excess nutrients by not overfeeding fish if you have them.
Do I need to add fish to my natural pond?
While not necessary, you can add a few fish to your pond. However, keep the fish population low to prevent nutrient buildup and avoid feeding them too much.
How often should I clean my natural pond?
Natural ponds require minimal cleaning. Avoid cleaning the rocks and liner frequently, as this can disrupt beneficial bacteria. Instead, let the plants and natural processes manage the water quality.
Can I use tap water to fill my natural pond?
Yes, you can use tap water to fill your pond. However, if your tap water is chlorinated, let it sit for 24-48 hours to allow chlorine to dissipate before adding plants or wildlife. Better yet use water from rain collection if available.
What maintenance tasks are needed for a natural pond?
Maintenance tasks include seasonal cleanups, monitoring water levels and quality, trimming plants, and ensuring the pond edges are secure. Regular observation helps keep the pond healthy with minimal intervention.